
It is not necessary to run the alarms service in a separate domain,
though depending on the individual system configuration it may still be advisable
not to embed the service in a domain already burdened with higher memory
requirements. To handle alarms under a relatively high load
(100Hz on the server end) requires only about 2% more of the cpu,
but about 75-100 MiB of additional space. In order to
capture any alarms from other domains at startup, it is also
necessary to arrange for the alarm service to start before the other
doors and pools.
While there is nothing strictly preventing the use of multiple alarms
services, under normal circumstances this should not be necessary.
The only constraint on the service set-up has to do with the
storage option. Unlike for the RDBMS (relational database) back-end,
there is currently no option for remote access of the XML file.
Since the alarms storage needs to be written to by the alarms
service but also read by the httpd service, it is thus necessary
for that file to exist on a shared or mounted partition visible to both.
Obviously, no such requirement exists for the RDBMS option.
Add the alarms service to a domain in the layout file:
    [alarmsDomain]
    [alarmsDomain/alarms]
    alarms.db.type=rdbms
    ...
OR
    [someotherDomain]
    [someotherDomain/alarms]
    alarms.db.type=rdbms
    [someotherDomain/someotherservice]
    ...
Note that the storage type setting alarms.db.type
must be defined either in the layout or /etc/dcache/dcache.conf
file because its default value is off; this can be set to
either xml, or rdbms. In the latter
case, the standard set of properties can be used to configure the connection
url, db user, and so forth. Before using the rdbms
option for the first time, be sure to run:
createdb -U alarms.db.user alarms
to create the database; as usual, the actual schema will be initialized automatically when the service is started.
For the XML option, the storage file is usually found in the shared directory
for alarms (corresponding to alarms.dir); the usual path is
/var/lib/dcache/store.xml, but the location can be changed by setting
alarms.db.xml.path. This will automatically be propagated
to alarms.db.url and consequently to
httpd.alarms.db.url if the two domains are on the same
host; if they are not (and share this file path via a mount, for instance),
be sure to set the httpd property in the layout or
/etc/dcache/dcache.conf on the httpd host to
correspond to the new alarms.db.url.
As a rule of thumb, the choice between XML and RDBMS is dictated by two factors: whether it is feasible to share the XML file between the two services as noted, and how much history is to be preserved. While the XML option is more lightweight and easier to configure, it is limited by performance, experiencing considerable read and write slowdown as the file fills (beyond 1000 entries or so). If you do not need to maintain records of alarms (and either manually delete alarms which have been serviced, or use the built-in cleanup feature – see below), then this option should be sufficient. Otherwise, the extra steps of installing postgreSQL on the appropriate node and creating the alarms database (as above) may be worth the effort.
The alarms infrastructure is actually a wrapper around the logging
layer and makes use of a simple tcp socket logger to transmit logging events
to the server. In each domain, the /etc/dcache/logback.xml
configuration references the following properties to control remote logging:
        dcache.log.level.remote=off
        dcache.log.server.host=localhost
        dcache.log.server.port=9867
As with the alarms service database type, remote logging is
turned off by default. Under normal circumstances it should be
sufficient to set this to error in order to receive alarms.
All internally generated alarms (see below) are in fact guaranteed to
be sent at this logging level. Remote transmission of events at lower
logging levels is possible, but caution should be taken inasmuch anything
below warn significantly increases network traffic
and could risk overloading the server or creating a bottleneck.
This service was not designed to provide robust centralized debugging.
If all of your dCache domains run on the same host, then the
default (localhost value will work. But usually your
dCache will not be configured to run on a single node, so each node will
need to know the destination of the remote logging events. On all the nodes
except where the actual alarms service resides, you will thus need to
modify the /etc/dcache/dcache.conf file or the
layout file to set the dcache.log.server.host
property (and restart dCache if it is already up). The default
port should usually not need to be modified; in any case, it
needs to correspond to whatever port the service is running on. From
inspection of the /usr/share/dcache/alarms.properties file, you
can see that the alarms-specific properties mirror the logger properties:
     #  ---- Host on which this service is running
     alarms.net.host=${dcache.log.server.host}
     #  ---- TCP port the alarms service listens on
     alarms.net.port=${dcache.log.server.port}
The first property should not need any adjustment, but if
alarms.net.port is modified, be sure to modify the
dcache.log.server.port property on the other nodes to
correspond to it. In general, it is advisable to work directly with the
dcache.log.server properties everywhere.
Example:
An example of a dCache which consists of a head
node, some door nodes and some pool nodes. Assume that the
httpd service and the alarms service are
running on the head node. Then you would need to set the
property dcache.log.server.host on the pool
nodes and on the door nodes to the host on which the
alarms service is running.
dcache.log.server.host=<head-node>
As stated previously, the dCache alarm system runs on top of
the logging system (and more specifically, depends on the
ch.qos.logback logging library). It promotes
normal logging events to alarm status in one of two ways.
BUILT-IN (MARKED) ALARMSSome alarms are already coded into dCache. These bear the general logging marker
ALARMand also can carry sub-markers for type and uniqueness identifiers. They also carry information indicating the host, domain and service which emits them. All such alarms are logged at the ERROR event level.SERVER-SIDE (OPTIONAL) ALARMSLogging events which arrive at the alarm server, but which do not carry a specific alarm type marker (these may be events at any logging level, not just ERROR), can nevertheless be redefined as a specific type of alarm via a set of filters provided by the administrator. These filters or custom alarm definitions reside in a special XML file usually written to the alarms space. Further explanation as to how to create such filters is given in another section below.
The notion of alarm or alert carries the implication that this particular error or condition requires user attention/intervention; there may be, however, differences in urgency which permit the ordering of such notices in terms of degree of importance. dCache allows the administrator complete control over this prioritization.
The available priority levels are:
CRITICALHIGHMODERATELOW
Any alarm can be set to whatever priority level is deemed appropriate.
This can be done through the admin interface commands (see below).
Without any customization, all alarms (of both types) are given a
default priority level. This level can be changed via the value of
<variable>alarms.priority-mapping.default</variable>, which by default
is critical.
Filtering based on priority is possible both in the webadmin page (see below), and for alarms sent via email (<variable>alarms.email.threshold</variable>; fuller discussion of how to enable email alarms is given in a later section).
Note
There also exists the possibility of filtering out only alarms from the main database into a separate log file. This option is enabled using <variable>alarms.enable.history</variable>, and similarly has a priority threshold, <variable>alarms.history.threshold</variable>. This is particularly useful in tandem with the XML storage option; it allows preservation of a condensed record of the alarms even after their full entries have been deleted from the database.Some basic alarm commands are available as part of the dCache shell. The following is an abbreviated description; for fuller information, see the dCache man page.
alarm sendSend an arbitrary alarm message to the alarm server. The remote server address is taken from the local values for <variable>dcache.log.server.host</variable> and <variable>dcache.log.server.port</variable>. If the [-t=TYPE] option is used, it must be a predefined (internal) alarm type.
alarm listDisplays a list of all alarm types currently defined in dCache code (i.e., predefined, internal types). Since these types can be modified with any incremental release, a listing in this manual would be of limited value. It is easy enough to check which ones currently are defined using this command, the
predefined lsadmin command, or the auto-completingAlarm Typecombo box on the webadmin alarms page.alarm [add | modify | remove]Activates an interpreter for adding, modifying or removing a filter definition. The interpreter walks you through the steps and choices. The results are written to the definitions file given by the local value for <variable>alarms.custom-definitions.path</variable>.
A similar set of commands is available through the admin interface.
To see fuller information for each of these, do help [command].
definition add [OPTIONS]Add a new custom definition; if a definition of this type already exists, the new definition will overwrite it.
definition keywordsPrint the list of attribute names whose values can be used as keyword identifiers for the alarm.
definition ls [type]Print a single definition or sorted list of definitions.
definition reload [path]Reinitialize the definitions from the saved changes.
definition rm typeRemove the existing alarm definition.
definition save [path]Save the current definitions to persistent back-up.
definition set type name valueSet the attribute of an existing alarm definition.
definition unset type nameUnset (remove) the attribute of an existing alarm definition.
predefined lsPrint a list of all internally defined alarms.
priority get defaultGet the current default alarm priority value.
priority ls [type]Print a single priority level or sorted list of priority levels for all known alarms.
priority reload [path]Reinitialize priority mappings from saved changes.
priority restore allSet all defined alarms to the current default priority value.
priority save [path]Save the current priority mappings to persistent back-up.
priority set type low|moderate|high|criticalSet the priority of the alarm type.
priority set default low|moderate|high|criticalSet the default alarm priority value.
send [OPTIONS] messageSend an alarm to the alarm service.
Note
Custom definitions and priority mappings are backed by files corresponding to the properties <variable>alarms.custom-definitions.path</variable> and <variable>alarms.priority-mapping.path</variable>, respectively. It is always possible to modify these files directly by hand. These by default are mapped to/var/lib/dcache/alarms.custom-definitions.xml
and /var/lib/dcache/alarms-priority.properties. In order
for the changes to take effect, either restart the alarms domain, or
use the respective reload admin command. It should be
understood that when using the admin commands, any modifications are done in
memory only and are not flushed automatically to the underlying file,
so any permanent changes need to be made via the save
command.
Note
It is possible to change the file locations by setting the above-mentioned properties in the layout or/etc/dcache/dcache.conf.
As can be seen from the admin commands, it is also possible to specify the
path as an option on the respective save and
reload commands. Note, however, that this is meant
mainly for temporary or back-up purposes, as the path defined in the local
dcache configuration will remain unaltered after that command
completes and the priority map or definitions will be reloaded from there
once again whenever the domain is restarted.
Note
Any changes made via thepriority set default command
are in-memory only. To change this default permanently, set the
<variable>alarms.priority-mapping.default</variable> property
in the layout or /etc/dcache/dcache.conf.
The Alarms Web Page is an admin page and thus requires authentication. You
must enable HTTPS and set an admin gid (0 by default):
Note
For the authenticated mode you need to generate a pk12 hostcert for
SSL. This can be done by running the dcache command:
import hostcert [--hostcert=FILE] [--hostkey=FILE] [--out=FILE] [--password=PASSWORD]
after obtaining a hostcert and hostkey, which are by default placed in
/etc/grid-security.
    [httpdDomain]
        httpd.enable.authn=true
        httpd.authz.admin-gid=<1234>
    [httpdDomain/httpd]
-
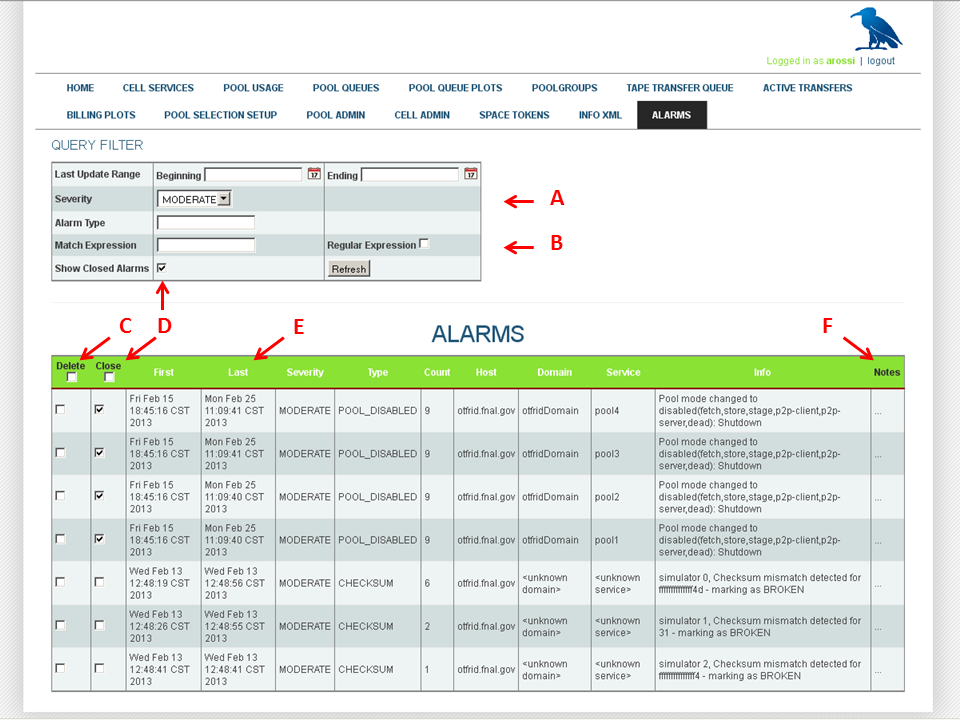
The QUERY FILTER form can be used to limit the display of
alarms in the table. The underlying query to the database is
based on whether the entry has been marked as an alarm (the radio buttons
indicating undefined, yes and no, respectively), the time interval
in which to search, the
alarm type, and the result range; these are marked by 'D' on the example screenshot above. The date referred to inafterandbeforeis that of the latest update to that entry, not the timestamp of its original arrival. Each click of theRefreshbutton will reload the data from the database based on these parameters. The default behavior is ALL ALARMS ONLY (unspecified type or range). Placing a single date in the Beginning box will give you all entries from that date up to today (inclusive); a single date in the Ending box will give all entries up to that date (inclusive). The other options, marked by 'M', all do in-memory filtering. -
The
Prioritychoice works like a debugging level, such that choosingMODERATEwill expose all alarms of that priority or above, thus includingHIGHandCRITICAL, but excludingLOW. Note that non-alarms are unaffected by this setting. -
The
Match Expressionfilters by appending all fields to a single string and searching for a matching substring. If theRegular Expressionbox is checked, the expression to match is compiled as a (Java) regex. -
The header of the result table contains two checkboxes which allow
you to check or uncheck the respective columns for all
displayed items. Checking
Deleteand then clickingRefreshwill actually eliminate the entry from persistent store. Closedis a way of marking the alarm as having been dealt with while maintaining a record of it. TheShow Closed Alarmscheckbox allows you to display them (turned off by default).- All column titles appearing in white can be clicked to sort the table by that column. While there is no column indicating alarm priority (as this attribute is external to the alarm schema), alarms are sorted by priority first. Non-alarms follow alarms. If both alarms and non-alarms are displayed, alarms are colored dark red.
Notesis an editable field to be used for any special remarks.
When Refresh is clicked, any updates to
Closed and Notes are first
saved, then any Deletes are processed, and
finally, the table is repopulated using the current query
filter. The entire form is set to auto-refresh every 60 seconds.